
Guide to the reduction of ISAAC-SW imaging data with ESO/MVM
Scope
This is a step-by-step user guide of the image data reduction process with ESO-MVM starting from raw files downloaded from the ESO Archive to the point of a mosaiced image with proper astrometric registration. The processing is demonstrated by means of a simple though non-trivial sample data set drawn from the ESO/GOODS imaging survey undertaken in the CDF-S region using the ISAAC instrument mounted at the Antu Unit Telescope of the VLT at ESO's Cerro Paranal Observatory, Chile.
Requirements to run this demo
- ESO archive user registration. In case you are not yet registered, go to the ESO User Portal and follow the instructions given there.
- Installation of the ESO-MVM 1.3.5 software package. More specifically, the two binaries alambic, and create_mosaic have to be in the user's PATH.
- Disk space of 450 MB for raw data, processing, and reduced data products
Demo preparation
1. Create a directory and change the current working directory, for instance
$ mkdir mvmdemo; cd mvmdemo
2. Download this tarball which contains the list of raw files, the astrometric reference catalogue, and the definition of the target astrometric grid. Unpack with
$ tar xf demo-isaac-sw.tar
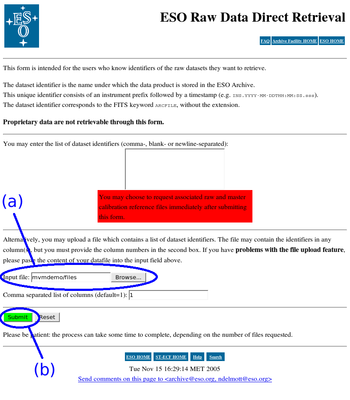
3. Download the sample data set from the ESO Archive, using the ESO Raw Data Direct Retrieval Service. Either follow the given link, or navigate your browser to the ESO Archive, choose ESO Archive Services from the navigation menu displayed on the left, and then Data Direct Retrieval. In this form, as displayed on the right, (a) specify the list of raw files in the field Input file, possibly using the Browse... button, and (b) Submit your query. Login to the ESO archive when you are prompted. On the next page, titled REQUEST SUBMISSION SETUP, select your output medium, and push the Submit button. The rest of the process is usual ESO archive operations business. Once the data has been retrieved from the archive, you'll get a notification via email, and the data transfer to your local host may commence, probably via FTP.
4. Create a subdirectory named raw in your working directory and place the raw files from the ESO Archive there.
5. Copy the two ESO/MVM configuration files alambic.xml and alambic-isaac-sw.xml into your working directory, depending on the location of your installation.
$ cp ../esomvm-1.3.5/config/alambic.xml .
$ cp ../esomvm-1.3.5/config/alambic-isaac-sw.xml .
Setup of the configuration file
At first the instrument has to be specified in the ESO/MVM configuration file alambic.xml for which any standard text editor may be used. The instrument has to be entered in two places. Go to line number 12 and change
href="./alambic-to-be-set.xml#xpointer(/mvm-alambic/*)"
into
href="./alambic-isaac-sw.xml#xpointer(/mvm-alambic/*)"
and then, change line number 22, into
<instrument-name>isaac-sw</instrument-name>
ESO/MVM processing steps are enabled by changing
<active>no</active>
into
<active>yes</active>
in the respective section. The steps may be executed one-by-one (as descibed in this demo) or multiple steps may be enabled and executed in a single go. For the later option, the configuration file named demo.xml has been included in the tarball.
You may also consider the MVM configuration editor, a graphical user interface which helps to create, change and manage MVM's XML configuration files in a user-friendly manner. However, for the purpose of this demo it is not required to have the configuration editor installed and the following descriptions assume the use of a simple text editor.
Step 1 - Preparation
Activate this step which is the first of the preparatory steps in the course of data processing with ESO/MVM by changing the respective node in alambic.xml (line number 34) to
<chip-organization>
<active>yes</active>
<debug>no</debug>
</chip-organization>
Now, run from the command line
$ alambic alambic.xml
In this case not much happens at this step (except for data duplication) because ISAAC-SW is a single detector chip instrument. In case of multi-chip instruments the multi-extension FITS files are split into single files per chip. In any case, execution of this step is a prerequisite in order to proceed with the following processing steps of ESO/MVM. After having run this step, it is a good idea to deactivate its execution in the configuration file by re-setting the respective node to
<active>no</active>.
Step 2 - Meta-data harmonisation
In node <fits-keyword-mapping> set <active>yes</active>, to be found in line number 39 of the configuration file, and run
$ alambic alambic.xml
In this step FITS keyword data of the raw files will be harmonised in order to facilitate the following data organisation steps. Don't forget to de-activate after execution.
Step 3 - Data organisation
In node <create-observation-block> set <active>yes</active>, to be found in line number 44 of the configuration file, and run
$ alambic alambic.xml
In this fundamental data organisation step, the raw input files are grouped into so-called observation blocks which define potential products to be generated from the raw data. The resulting observation blocks may be found in the subdirectory ob. Don't forget to de-activate after execution.
Step 4 - Data organisation (calibrations)
In node <create-instrumental-calibration-block> set <active>yes</active>, to be found in line number 49 of the configuration file, and run
$ alambic alambic.xml
Based on the previously generated observation blocks, this creates the reduction blocks which define the to-be-generated master calibrations such as dark frames, flat fields etc. (cf. Step 7). The reduction blocks may be reviewed in the subdirectory rb. Don't forget to de-activate after execution.
Step 5 - Data organisation (science)
Here, the science reduction blocks which define the buildup of final science images out of raw files are created and the way of processing is specified.
In line 228 of the configuration file alambic.xml, change
<pattern>cdfs</pattern>
into
<pattern>^F14|^chandra</pattern>
so that the whole subnode reads:
<pattern-definition>
<pattern>^F14|^chandra</pattern>
<reduction-mode>extragalactic-deep</reduction-mode>
</pattern-definition>
With this setting the appropriate reduction mode for the observation has been selected by matching the value of the FITS header key OBJECT with the given regular expression, aka pattern. In this case, images having OBJECT equal to "F14" or "chandrafield" will be associated with the "extragalactic-deep" reduction mode of ESO/MVM. Note that the pattern syntax is compliant with POSIX regular expressions (not case sensitive!). Refer to, e.g., http://www.regular-expressions.info to learn more.
In node <create-scientific-reduction-block> set <active>yes</active>, to be found in line number 54 of the configuration file, and run
$ alambic alambic.xml
The generated science reduction blocks are to be found in the subdirectory called rb. Don't forget to de-activate after execution.
Step 6 - Master calibrations generation
Activate this step by setting <active>yes</active> in node <stack-instrumental-calibration> (line number 96 of the configuration file), and run
$ alambic alambic.xml
The resulting master calibration files, types dark and flat-sky in this case, may be found in the subdirectory calib/1Don't forget to de-activate after execution.
Step 7 - Science data processing
 All the major processing of the science data takes place here, including removal of basic instrumental signatures using the prepared master calibration files, de-fringing, subtraction of the smooth background, stacking of individual exposures, astrometric registration and resampling to the target grid.
This requires an input astrometric catalog named Astrometric_Catalogue_01.cat in the subdirectory catalogue, and a definition of the target astrometric grid (the one the resulting images will be resampled to) in the subdirectory grid to be supplied by the user. The astrometric grid will be adopted from the WCS information of the FITS image with filename of the form RefGrid.<timestamp>.fits with <timestamp> being arbitrary. To simplify matters for this demo, the tar ball includes the two required files and unpacking has placed them at the proper locations. In order to start processing the science data, set <active>yes</active> in node <stack-science-reduction-block> (to be found in line number 132 of the configuration file) and run
$ alambic alambic.xml
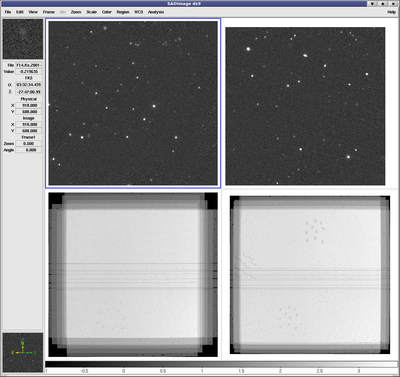
The resulting science data products are to be found in the subdirectory called sci/1 and may be examined, using ds9 for instance, as shown on the right, with the command
$ ds9 sci/1/F14.Ks.2001-09-30T09:22:57.fits \
sci/1/chandrafield4.Ks.2002-01-21T01:01:31.fits \
sci/1/F14.Ks.2001-09-30T09:22:57.weight.fits \
sci/1/chandrafield4.Ks.2002-01-21T01:01:31.weight.fits
As mentioned before, instead of run ESO/MVM step-by-step, it is possible as well to execute ESO/MVM with multiple steps enabled. To demonstrate this option, and as a reference, the configuration file named demo.xml has been included in the tarball and you may re-do steps 1 through 7 by saying simply
$ alambic demo.xml
Step 8 - Building the final mosaic
- Create lists of images and weight maps
$ echo sci/1/F14.Ks.2001-09-30T09:22:57.fits >image.list
$ echo sci/1/chandrafield4.Ks.2002-01-21T01:01:31.fits >>image.list
$ echo sci/1/F14.Ks.2001-09-30T09:22:57.weight.fits >weight.list
$ echo sci/1/chandrafield4.Ks.2002-01-21T01:01:31.weight.fits >>weight.list - Mosaic the images with
$ add_mosaic --cube_image image.list \
--cube_weight weight.list --norm_keyword NOFLXSCALEor, alternatively, you may use any other software of your choice to combine the science images into a single mosaic.
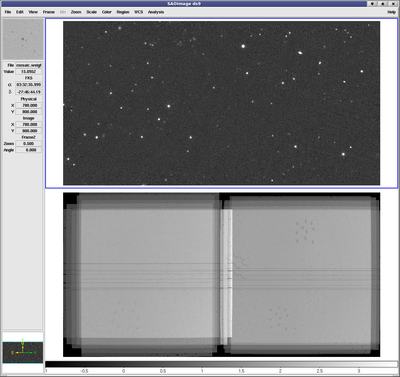
- 3. Examine the result with
$ ds9 mosaic.fits mosaic.weight.fits
Conclusion
The data reduction of a small NIR data set using the ESO/MVM software package has been demonstrated in eight simple steps. The final product is a fully astrometrically calibrated mosaic image being ready for subsequent scientific analysis.